Search This Blog
Featured Post
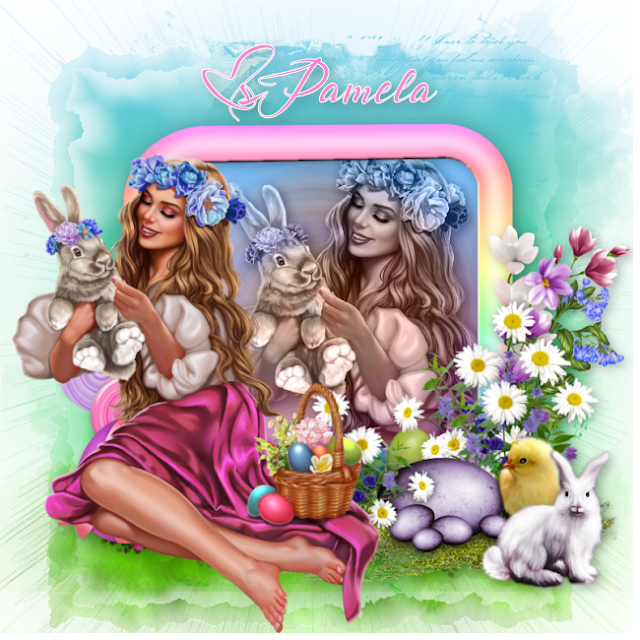
Bunny Love
PTU Tutorial Supplies needed: Paint Shop Pro X or any version Spring_and_Easter by Alehandra Vanhek here (you must be licensed to use...
Popular Posts
-
FTU Tutorial The Book of Elias Supplies needed : Tube: I used Melissa 2 by Elias Chatzoudis here you need a license to use this art, Fr...
-
No Scrap Tutorial Curled and Whirled Supplies Needed: Tube of choice, I used Amberly Berendson, you can purchase at DAH Font of choice, I u...
-
FTU Tutorial Ice Cream, Cupcakes and Chocolate Supplies needed: Neopolitan Scrap kit by TKDezigns here Tube of choice, I used Fiodorova Ma...
-
No scrap tutorial Majestic Mermaid Items needed: PSP9 or any version DBV Mask 110 here Scenic photo of choice,I used Jon Rattenbury, you m...
-
FTU Tutorial With A Tender Heart Disclaimer: This tutorial was written by Pamela A. Mabry on January 11, 2022 with PSP 10, but any other ve...
-
PTU Tutorial Yellow's Glow! Supplies needed: Paint Shop Pro 2023 or any version Tube: Summer by Kiya's Designs here Mask: DBV...
-
FTU Animated Tutorial Turbulent Sea Tag Disclaimer: This tutorial was originally written August 12, 2012 and revised on January 14, 2022 fr...
-
No scrap tutorial Capsulated Tag This tutorial is written for those with a working knowledge of PSP. Disclaimer update: August 17, 2024, t...
-
FTU Tutorial BCA In Pink Supplies needed: Paint Shop Pro 2021 or any version Tube: I Believe by Zindy S. D. Nielsen here Becky Mask...
-
No scrap tutorial Fairy Glass Banner Supplies needed: Tube of choice I used Judy Mastrangelo this is a licensed tag and can be purchased F...
About Me

- P Mabry
- I've been working with PSP since 2004 and I love creating tags, stationery, cluster frames, scrap kits and templates.I also enjoy my children, grandchildren, reading, music and movies.
Followers
What you’ll need:
Paint Shop Pro
2023 or any version
Picnic tube by Stella Felice Art here you need a license to use this tube
HorsePlays Pasture Mask 27 here, thanks Beverly
PTU Spring Fever kit by Uenique PSP here
Font of choice, I used Sweet Sensations
Disclaimer: This tutorial is written by Pamela A. Mabry
on March 29, 2024 and is solely from my own imagination, any similarity to any other/s
is pure coincidence. This tutorial is written with the assumption you have a
working knowledge of Paint Shop Pro.
Remember to apply
your drop shadow as you proceed.
I use h and v 2 opacity 30 blur 10
Let’s move on!
Open paper 20, shift + d, close original, promote background layer

PTU Tutorial
Supplies needed:
Paint Shop Pro
X or any version
Spring_and_Easter by Alehandra Vanhek here
(you must be licensed to use this tube)
Masks_62024_Ashley'sDesigns_5 here
Bunnies, Chicks and Eggs by me here or here
Faithe font here
Disclaimer: This tutorial is written by Pamela Mabry
on March 20, 2024 and is solely from my own
imagination, any similarity to any other/s is pure coincidence. This tutorial
is written for those with a working knowledge of Paint Shop Pro.
Remember: to apply your drop shadow as you proceed.
Let’s begin
Open paper 0013, shift+ d, close original, promote background layer
Apply mask, merge group
c/p frame 0021, resize 80%
click in center of frame with your magic wand, expand by 20
add a new layer under the frame layer
Copy paper 0015 and paste into selection, keep selected
Open tube, paste resize 40%, place as shown orto your liking
Duplicate tube, layers, arrange, send to top, close this layer
Go back to original tube layer, duplicate
Go back to original layer
Selection, invert, delete, select none
Adjust, blur, radial blur, set blur type to spin, strength to 75, all others to 0 and check elliptical, blend mode - luminance(L)
element 5, apply mask, merge group, move down, select all, crop to selection
Duplicate and move up slightly under the frame
el 56 - 70%
el 14
el 80 - 40%
el 97 - 40%
el 87 - 80%
el 84 - 30%
el 120 - 40%, free rate left at 35
el 119,- 40%, free rotate left at 35
el 65 - 40%
el 32 - 40%
Open your closed tube layer and position to your liking.
Add artists name, url and your license number.
Add name you want
Delete background layer
Resize
You're done !
Thanks for viewing my tut !

PTU Tutorial
Supplies needed:
Paint Shop Pro X or any version
Straw_ Hat tube by Fiodorova_Maria here
Edge Squares mask here
Faithe font here
Tag Template #6 by Rose here
Disclaimer: This tutorial is written by Pamela Mabry
on March 18, 2024 and is solely from my own
imagination, any similarity to any other/s is pure coincidence. This tutorial
is written for those with a working knowledge of Paint Shop Pro.
Remember: to apply your drop shadow as you proceed.
Let’s begin !
Open template, shift + d, close original
Delete the credit, copy of raster 8, raster 8 and raster 18 layers
Go to the background layer
Add a new raster layer, select all
C/p paper 04 into selection
Apply the mask, merge group, duplicate, merge down
Highlight the double circles
Select, float, defloat, paste paper 04 into selection
Click copy of raster 9 and merge down
Select, float, defloat
Copy paper 05 and paste into selection
Select the circle and fill with paper 07
Merge down copy of raster 6
Select all, float, defloat
Paste paper 012 into selection
Merge down copy of raster 7
Select all, float, defloat
Paste paper 09 into selection
Click raster 3, select, float, defloat
Paste paper 011 into selection
Raster 13, select, float, defloat
Paste paper 010 into selection
Select raster 12 same as above and paste paper 06 into selection
Select raster 4 and paste paper 011 into selection
Select raster 11 and paste paper o2
Raster 10 - paper 04
Raster 17 - paper 03
El 48 - 40%
El 32 - 40%
Raster 16 - paper 04
Raster 15 - paper 09
Raster 5 - paper 06
EL 4 - 50%, duplicate, mirror
El 1 - 50%, duplicate, mirror
El 29 - 40%, duplicate, mirror, erase the stems
El 45 - 70%
El 12 - 25%
El 19 - 50%
El 40 - 30%
El 77 - 30%
El 35 - 30%
El 15 - 40%
El 38 - 30%
El 63 - 30%
El 64 - 30%
Paste your close-up in the frames as shown
C/p your tube, resize to your liking
Add copyright info and nme.
You're done !
Thanks for viewing !

What you’ll need:
Paint Shop Pro
2023 or any version
Girl-with-a-bunny tube by Laguna here
Miz mask 284 here
Cute As A Bunny by Melissaz Creationz here
Beautiful Dream font here
Disclaimer: This tutorial is written by Pamela A. Mabry
on March 16, 2024 and is solely from my own imagination, any similarity to any other/s
is pure coincidence. This tutorial is written with the assumption you have a
working knowledge of Paint Shop Pro.
Remember to apply
your drop shadow as you proceed.
I use h 4, v 2
opacity 30 blur 20
Let’s move on!
Open paper 03, shift + d, promote background layer
Close original paper
Apply mask, merge group
e 7, move to right
e 22, rs 80%
e 10
e 19
e 13, move down right, duplicate and move right and down
e 20 duplicate, move to side and down
e 16, place bottom right, duplicate, move right and slightly down
e 17, place bottom right, duplicate, move right and slightly down
e 6, rs 70%, place bottom right, duplicate, mirror
paste e6, rs 70%, place bottom center, merge down, merge down
e 40, rs 80%, move right bottom
e 40, rs 70% arrange as shown
e 27
e 28, rs 70%
e 26
Open the tube
c/p the rainbow, paste on the mask layer, rs 60%
c/p the small rabbit, rs 20%
c/p the girl, rs to your liking
Apply your copyright and info
All done !
Thanks for viewing my tutorial !

Supplies needed:
Paint Shop Pro 2023 or any version
Tube: Jasmine here
SophistcatSimone mask 60 or your choice
Geraldine font here
Disclaimer: This tutorial is written by Pamela Mabry
on March 15, 2024 and is solely from my own
imagination, any similarity to any other/s is pure coincidence. This tutorial
is written for those with a working knowledge of Paint Shop Pro.
Remember: to apply your drop shadow as you proceed. I use h and v 2, opacity 30, blur 10.
Let’s begin
Open paper 021, shift + d, close original
Promote background layer
Apply your mask, merge group
c/p frame 013, rs 70%
Add a new layer and move below frame
Back to frame layer , with magic wand click inside frame
Expand by 15, keep selected
Highlight layer below frame
c/p paper 022 into selection, keep selected
c/p el 074, move to bottom, selections, invert, delete
c/p el 00113, rs 60%
c/p 0069, rs 30%
c/p el 0056, rs 20% move to bottom right, duplicate, mirror
c/p el 0089 move right, duplicate, mirror
c/p el 0096, rs 20%
c/p 0072, rs 40%
c/p 0069, rs 30%
c/p 0020, rs 40%, place on top of frame bottom
Duplicate, mirror
c/p 0048 on top of frame, rs 40%
Place on side bottom corner, duplicate, mirror
c/p el 0066, rs 30%
c/p 0068, rs 30%
at this point, you're done unless you want to add a tube
do so and resize and add your copyright info.
Thanks for viewing.

PTU Tutorial
Feeling Lucky !
Supplies needed:
Paint Shop Pro
X or any version
Tamara SV (1)(included in kit)
RD_mask 739 here
AWS_Luck To You here here here, coming soon here
Rockybilly font here
DD_Feeling Lucky Template (I could not find a link to this template)
Disclaimer: This tutorial is written by Pamela Mabry
on March 14, 2024 and is solely from my own
imagination, any resemblance to any other/s is pure coincidence. This tutorial
is written for those with a working knowledge of Paint Shop Pro.
Remember: to apply your drop shadow as you proceed. I used h and v 2, opacity 30, blur 10.
Let’s begin
Open template, shift + d
Image, canvas size 800 x 800, center
Delete credit, raster 14, right dark green square, right gold rectangle and stitches layers
Close all word art and clover layers
Highlight background layer, fill white
Apply a new layer, select all
Paste paper 21 into selection
Apply mask, merge group
Click on the left gold rectangle layer,
right click, merge, merge down
Select all, float, defloat
C/p paper 12 into selection
Click the left light gold square, merge down
Select all, float, defloat
C/p paper 7 into selection
Select all, float, defloat the dark green slats
C/p paper 18 into selection
Select all, float, defloat the green oval
C/p paper 16 into selection, keep selected
C/p Tamara SV (4) as a new layer
Resize 60%, duplicate, highlight raster 1
Adjust, blur, motion blur
Apply ds to tube
Select, float, defloat the dark green square
C/p paper 14 into selection
C/p Tamara SV 3 as new layer
Resize 50%, move into square
Selections, invert, delete, select none
Duplicate tube, on original apply a radial blur

What you’ll need:
Paint Shop Pro 2023 or any version
Patric by Misticheskaya here
RD_Mask 737 here
St. Patrick Party here
Font: Slaine here
Disclaimer: This tutorial is written by Pamela A. Mabry on March 13, 2024 and is solely from my own imagination,in the event, any similarity to any other tutorial is found, it is pure coincidence. This tutorial is written with the assumption you have a working knowledge of Paint Shop Pro.
Remember to apply your drop shadow as you proceed.
I use h and v 2 opacity 30 blur 10
Let’s move on!
Open a 700 x 700 transparent image
Fill with white and apply a new layer
Select all, paste paper 8 into selection
Apply mask, merge group
Resize mask 110%, duplicate, merge down
El 39, rs 40%
El 40, rs 40%, duplicate, mirror, place as shown
El 56, rs 40%
El 37, rs 40%
El 46, rs 60%
El 47, rs 50%, move center right
El 55, rs 60%, duplicate, rs 90%, move right and slightly down
El 53, rs 20%, duplicate, move right and down some
El 54, rs 15%, place to left of flower, duplicate, place as shown
El 51, rs 30%
El 5, rs 10%
El 6, rs 15%
El 4, rs 10%
El 9, rs 30%
El 65, rs 10%
El 29, rs 10%
El 59, rs 20%
El 58, rs 15%
El 92, rs 5%
Copy and paste your tube, resize
Apply your drop shadow
You're done.
Thanks for viewing my tutorial.

Labels
- 4th of July
- 70's
- aetherize
- Alehandra Vanhek
- Alena Lazareva
- Alex Prihodko
- Alicat Art
- Amberly Berendson
- AngelWingScraps
- animated
- art
- artist
- Autumn
- Awareness
- AWS Scraps
- BCA
- beach
- BellaCaribena
- Blissful Designs
- BTS
- Charlie
- Christmas
- CTTutorial
- Deedles N Doodles
- DeedlesNDoodles
- Designs by Shelly
- domestic violence
- DVA
- Easter
- Easter. FTU tutorial
- Elias Chatzoudis
- Eugene Rhevskii
- fairies
- fairy
- Fall
- fantasy
- Fiodorova Maria
- FiodorovaMaria
- flood
- FTU
- FTU Tutorial
- fun
- GOF
- Goldwasser
- Hania's Designs
- Ismael Rac
- Judy Mastrangelo
- Keith Garvey
- KennyK
- Kiya Designs
- Kiya's Designs
- Lady Mishka
- Laguna
- Lix
- Mardi Gras
- Maryline Cazenave
- Melissaz Creationz
- mermaid
- Misticheskaya
- mistified
- Mizteeque
- no scrap
- patriotic
- PFD
- Pin-Up Toons
- pink
- princess
- PTU
- PTU tutorial
- Rachel Anderson
- sea
- Sherri Baldy
- Simone
- Sophisticat Simone
- Souldesigner
- spring
- St. Patrick's Day
- St> Patrick's Day
- steampunk
- StellaFeliceArt
- Tamara SV
- The Paper Shelter
- Tiny Turtle Designs
- Tony Tzanoukakis
- Toosh Toosh
- turbulent
- tutorial
- UeniquePSP
- Valentines Day
- Very many
- white
- Zindy
Miggin's Extended CU4CU License
Denise Creationz Unlimited Use License
Denise Creationz CU4CU License
KPD Unlimited Use CU4CU License

Scraps Dimensions CU4CU Lifetime License
LMB CU4CU License
JDD Unlimited Personal Use License
JDD CU4CU License
